http://www.meebo.com/rooms

Monday, March 17, 2008

Add Blog Rating In Blogger

10 Simple steps how to add blog ratings plugin - The tutorial. This tutorial will explain how to add rating stars to a Blogger based blog. With this rating stars your readers can easily rate your stories. I'll try to keep this tutorial simple and clear enough. This blog rating is a free plugin from OutBrain.com site. Lets start the tutorial with only short steps to do.


1. Go to Outbrain.com site to get this plugin.


2. You'll see Get ratings button at frontpage of the site. Just click that button to start around.

3. You should be faced with a page contains many option there. Now click 1-click install button for Blogger. You can find Blogger logo easily there. For HTML Blogger classic template just jump to point 6th.

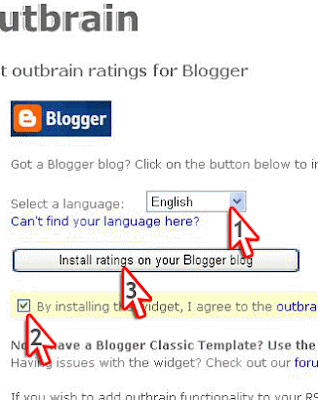
4. xml templateFirst select your prefered language for your ratings should be. You must agree with OutBrain TOS before continuing to get ratings. Than just click a button with "Install ratings on your Blogger blog" text on it.


5.You'll be redirected to Blogger login page. After you've got signed you'll be able to continue installing plugin. The ratings code will be shown automatically inside page elements addition area. What you must do here is only following the instruction how to add a page element in Blogger as usual. In the end of process you just have to save template changes and republish it. It is just simple as we think, didn't we?


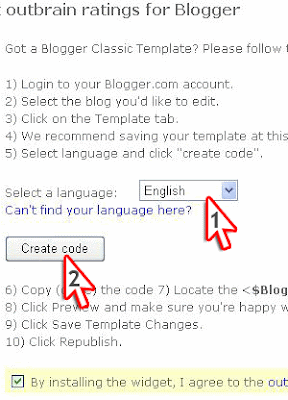
6. HTML templateFor HTML Blogger classic template please don't click the button. But let see around below TOS and Privacy Policy text. There is a link to instruction on how to use ratings in classic template. Click it there

7. Now just follow instruction listed at that page and click Create The Code button. Don't forget to check agreement statement.


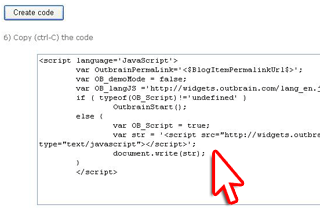
8. A box with the code will appear. Select that code and copy it. You can easily do this by simply hit Ctrl+C on your keyboard.


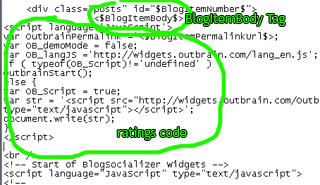
9. Locate <$BlogItemBody$> tag in your HTML template. Paste the code (CTRL+V) below the tag. You may add tag. See the example:


10. Just click Save Template Changes button as our final step. To see how this ratings plugin works just view your blog and test it.

Saturday, March 15, 2008

The Top Ten Free Website Tools and Services

The internet abounds with freebies and a do-no-evil attitude. And although there are many services that are worth every penny that you pay, here are the top ten freebies to help you build traffic and create a better visitor experience on your web site.

Google Analytics

Google Analytics has rapidly become the industry leader in site analytics - giving paid options such as WebTrends a run for their money. Simply copy and paste a small piece of code onto your web pages and Google offers advanced tracking and traffic statistics for free. To learn more about using Google Analytics, Ian Lurie of Conversation Marketing has developed a series of tutorial videos on the subject.

MyBlogLog and BlogCatalog

For Blogs I have not found a more effective way to drive traffic to a new site than through these two services. By combining social networking with helpful blogging tools, both MyBlogLog and BlogCatalog are making a huge impact on giving new blogs a kick-start to success.

HitTail and 103Bees

HitTail and 103Bees are similar in nature - they offer site owners a way to understand and analyze their search engine traffic in an easy-to-use interface. Both of them also indicate whether your site was found on the front page of search results, or in the “long tail” of search results (many pages down). This knowledge can then be used to develop content in specialized keyword niches to push your site up in search engine results.

FeedBurner

For any site that produces content for syndication, FeedBurner is an absolute must for managing and tracking RSS subscribers and republishers. The site offers extremely user-friendly advice with a support staff in the background that has an outstanding reputation for fast and friendly help.

MorgueFile Photos

Although having a unique and original site is quite important, there are times when everyone needs a photo for a small project that isn’t worth paying for. The Morgue File offers free high resolution digital stock photography for either corporate or public use. Usually all that is required is author notification that the photo is being used.

OpenAds

For sites that want to serve and track advertising, OpenAds is an easy and sophisticated program that can be installed on your server. It even allows for clients to have their own access to the system to see performance statistics, upload new ads, or change campaigns. Even if you don’t sell advertising on your site, OpenAds is a must if you want to track and optimize your own self-promotional efforts site-wide.

The 37Signals Suite

Although technically not a suite of tools for websites, the 37Signals programs are critically acclaimed as they offer tracking of project management, contact management, group communications and information organization. Any tool that so elegantly increases productivity and makes life easier is well worth mentioning on this list.

WordPress

If you or your business hasn’t already started a blog, it’s probably my most highly recommended site promotion tool of all. Just the search engine benefits alone are worth the time and effort of starting and maintaining a blog. WordPress is the industry standard blogging platform, and it is both free and easy to use.

Overture Keyword Selector Tool

For more advanced search engine optimization, it helps to do a little research on what exactly internet surfers are looking for. The Overture Keyword Selector Tool offers insights into the exact number of searches that Yahoo receives for search terms and their related phrases. By understanding what phrases are most common, you can use this knowledge to incorporate the highest volume keywords into your site.

Pew Internet

The non-profit Pew Internet Project offers highly valuable data, research and statistics on the impact of the Internet on families, communities, work and home, daily life, education, health care, and civic and political life. To understand your target audience better or to pull information for a business plan, this site offers a wealth of insights for savvy web entrepreneurs.This entry was posted on Friday, April 27th, 2007 at 12:05 pm and is filed under Productivity. You can follow any responses to this entry through the RSS 2.0 feed. You can leave a response, or trackback from your own site.

Some Troubleshooting Commands

Some frequently use commands:

ipconfig - Displays IP configuration information
ping - Tests connections to other IP hosts
tracert - Displays route taken to destination
netstat - Displays network connections
nslookup - Directly queries the name server for information on a destination domain


1. Troubleshooting using Ipconfig


Ipconfig

Ipconfig is used to display the current IP configuration information for a host. Issuing this command from the command prompt will display the basic configuration information including: IP address, subnet mask and default gateway.

Ipconfig /all

The command ipconfig /all displays additional information including the MAC address, IP addresses of the default gateway and the DNS servers. It also indicates if DHCP is enabled, the DHCP server address and lease information.

How can this utility assist in the troubleshooting process? Without an appropriate IP configuration, a host can not participate in communications on a network. If the host does not know the location of the DNS servers it cannot translate names into IP addresses.

Ipconfig /release and ipconfig /renew

If IP addressing information is assigned dynamically, the command ipconfig /release will release the current DHCP bindings. Ipconfig /renew will request fresh configuration information from the DHCP server. A host may contain faulty or outdated IP configuration information and a simple renewal of this information is all that is required to regain connectivity.

If after releasing the IP configuration, the host is unable to obtain fresh information from the DHCP server, it could be that there is no network connectivity. Verify that the NIC has an illuminated link light, indicating that it has a physical connection to the network. If this does not solve the problem, it may be an issue with the DHCP server or network connections to the DCHP server.


2. Troubleshooting using Ping


Ping

If the IP configuration appears to be correctly configured on the local host, next, test network connectivity by using ping. Ping is used to test if a destination host is reachable. The ping command can be followed by either an IP address or the name of a destination host, as for example:

ping 192.168.1.2


When a ping is sent to an IP address, a packet known as an echo request is sent across the network to the IP address specified. If the destination host receives the echo request, it responds with a packet known as an echo reply. If the source receives the echo reply, connectivity is verified.

If a ping is sent to a name, such as www.google.com , a packet is first sent to a DNS server to resolve the name to an IP address. Once the IP address is obtained, the echo request is forwarded to the IP address and the process proceeds. If a ping to the IP address succeeds, but a ping to the name does not, there is most likely a problem with DNS.

If pings to both the name and IP address are successful, but the user is still unable to access the application, then the problem most likely resides in the application on the destination host. For example, it may be that the requested service is not running.

If neither ping is successful, then network connectivity along the path to the destination is most likely the problem. If this occurs, it is common practice to ping the default gateway. If the ping to the default gateway is successful, the problem is not local. If the ping to the default gateway fails, the problem resides on the local network.

The basic ping command usually issues four echoes and waits for the replies to each one. It can, however, be modified to increase its usefulness. The Options listed in the graphic display additional features available.


3. Troubleshooting using Tracert

Tracert
The ping utility can verify end-to-end connectivity. However, if a problem exists and the device cannot ping the destination, the ping utility does not indicate where the connection was actually dropped. To accomplish this, another utility known as tracert must be used.
The Tracert utility provides connectivity information about the path a packet takes to reach the destination and about every router (hop) along the way. It also indicates how long a packet takes to get from source to each hop and back (round trip time). Tracert can help identify where a packet may have been lost or delayed due to bottlenecks or slowdowns in the network.

The basic tracert utility will only allow up to 30 hops between a source and destination device before it assumes that the destination is unreachable. This number is adjustable by using the -h parameter. Other modifiers, displayed as Options in the graphic, are also available.


4. Troubleshooting using Netstat

Netstat

Sometimes it is necessary to know which active TCP connections are open and running on a networked host. Netstat is an important network utility that can be used to verify those connections. Netstat lists the protocol in use, the local address and port number, the foreign address and port number, and the state of the connection.

Unexplained TCP connections can pose a major security threat. This is because they can indicate that something or someone is connected to the local host. Additionally, unnecessary TCP connections can consume valuable system resources thus slowing down the host's performance. Netstat should be used to examine the open connections on a host when performance appears to be compromised.

Many useful Options are available for the netstat command.


5. Troubleshooting using Nslookup


Nslookup

When accessing applications or services across the network, individuals usually rely on the DNS name instead of the IP address. When a request is sent to that name, the host must first contact the DNS server to resolve the name to the corresponding IP. The host then uses IP to package the information for delivery.

The nslookup utility allows an end-user to look up information about a particular DNS name in the DNS server. When the nslookup command is issued, the information returned includes the IP address of the DNS server being used as well as the IP address associated with the specified DNS name. Nslookup is often used as a troubleshooting tool for determining if the DNS server is performing name resolution as expected.


Friday, February 22, 2008

How to Reinstall Windows Without Losing Your Data

Over time, Windows loses stability. If you keep a computer for more than two years, at some point you're going to have to bite the bullet and reinstall Windows from scratch. But contrary to popular belief, you won't have to reformat your hard drive (with one exception, discussed below). The bad stuff you need to get rid of is all in your Windows folder.

Before you begin, gather your Windows and application CD-ROMs. Back up your data files (just to be safe), and then clear two days off your calendar. If everything goes smoothly, you can reinstall Windows in a few hours. But you have to assume something will go wrong: You may not be able to find a necessary CD, or data won't be where you thought it was, or something will simply refuse to work.

There's a difference between a repair reinstall and a complete reinstall. Though a repair (also called a refresh) will let you keep your current settings, a complete reinstall will give you a truly fresh version of Windows. Repairs are fast and easy, but they don't fix anywhere near as many problems. The instructions below are for total reinstalls, except where noted.

Your Vendor's Restore CD
Most computers ship with a vendor-specific restore CD rather than with a Microsoft Windows CD-ROM. (If your PC came with a Microsoft Windows CD, or if you bought a retail copy of Windows, skip to the section for your version.)

Some restore CDs give you all the options of a full Microsoft Windows CD, but with better instructions and the convenience of having all the right hardware drivers. Others can do nothing except reformat your hard drive and restore it to the condition it was in when you bought the PC. (This case is the exception I mentioned above that requires a reformat.)

If your restore CD is reformat-only, back up your data files to a network or a removable medium before reinstalling Windows. If you use Windows 98 or Me, back up C:\My Documents, plus the folders inside C:\Windows discussed in the 98/Me section below. If you have Windows 2000 or XP, back up C:\Documents and Settings. Also back up any other folders in which you store your data files.

Windows 98 and ME CDs
These Windows versions keep some important data inside your soon-to-be-erased Windows folder, so you need to copy several of its subfolders to another location. Right-click My Computer and select Explore. Double-click the C: drive icon (in Me, you may then have to click View the entire contents of this drive). Right-click in the right pane and select New, Folder. Name the new folder oldstuff.

Go to the Windows folder (you might have to click View the entire contents of this folder), hold down Ctrl, and select the following subfolders: All Users, Application Data, Desktop, Favorites, Local Settings, Profiles, SendTo, and Start Menu. If you don't see them all, select View, Folder Options (Tools, Folder Options in Me), click the View tab, select Show all files, and click OK. (If you still don't see them all, don't worry about it.) Press Ctrl and drag the folders to C:\oldstuff (see FIGURE 1).

Restart Windows with a start-up disk in your floppy drive. (To make a start-up floppy, insert a disk, select Start, Settings, Control Panel, double-click Add/Remove Programs, click Startup Disk, Create Disk, and follow the prompts.) At the Startup Menu, select Start computer with CD-ROM support. While the drivers load, insert your Windows CD-ROM.

Unless you're doing a repair reinstall, type the command c:\windows\command\deltree /y c:\windows and press Enter. Deleting your old files could take time, but the /y switch suppresses confirmation prompts, so take a break.

When you're back at the A: prompt, type x:setup, where x is your CD drive letter (it's likely one letter past what it usually is in Windows, so if it's D: in Windows, it's probably E: here). Press Enter and follow the prompts.

Once you're back in Windows, reinstall your graphics card driver. If you have Windows set up for more than one user, you'll also have to re-create each account. Select Start, Settings, Control Panel, Users to do so. It's important that the user names match those in the old installation. If you're not sure, open Windows Explorer and navigate to C:\oldstuff\profiles. There you'll find a folder for each registered user name (see FIGURE 2). Don't worry about passwords. Log off and log back on as each user. When you're done, log off and back on one more time, but instead of choosing a user name and a password, press Esc to enter Windows without being a specific user.

Select Start, Programs, MS-DOS Prompt (in Windows 98) or Start, Programs, Accessories, MS-DOS Prompt (in Windows Me). Type xcopy c:\oldstuff\*.* c:\windows /s /h /r /c and press Enter (if you want to know what the xcopy switches do, enter the command xcopy /?). When xcopy asks if it should overwrite a file, press a for All.

When xcopy is through, reboot and log on (as a particular user, if necessary). Open My Documents to make sure all your personal files are where they belong, including your Internet Explorer favorites and your custom Start menu shortcuts.

Now skip ahead to "Finishing the Job."

Windows 2000 and XP CDs
Boot your computer with your Windows CD-ROM inserted. When you get the 'Press any key to boot from CD' message, do so. (If you don't see that message before Windows starts, restart Windows, press the key you're prompted to enter for your PC Setup program, and change the boot order so your CD drive is first.)

At the 'Welcome to Setup' screen, press Enter. The R (repair) option takes you to the Recovery Module, which is useful if Windows won't boot, but it's no help with a reinstallation. Soon you'll be told that there's already a Windows installation on the computer. Press r for a repair reinstall or Esc to begin a complete, destructive one. For a complete restore, select your C: partition and press Enter. When you get the warning that says an operating system is on that partition, press c. When you are asked your partition preference, select Leave the current file system intact (no changes). When you're told that a Windows folder (or Winnt folder for Windows 2000) already exists, press l ('ell') to delete it and create a new one. Follow the series of prompts. When the installation program asks for your name, enter temp.

Once the installation is complete, your system will reboot into Windows, and you'll be logged on as user Temp. If the screen is difficult to read, reinstall your graphics card driver.

If you are reinstalling Windows XP, skip to "For Both Windows XP and 2000."

If you're reinstalling Windows 2000, log off as Temp and back on as Administrator. Now log off and on again, this time as Temp. Open Windows Explorer and navigate to C:\Documents and Settings. One of the subfolders will be named Administrator. Another will be named something like Administrator.computername.

Select Start, Programs, Accessories, Command Prompt. Type cd "\documents and settings" and press Enter. Then type xcopy administrator\*.* administrator.computername /s /h /r /c, replacing computername with the last part of that folder's name (after "Administrator.") in Documents and Settings. Now press Enter, and when you're asked about overwriting files or folders, press a for All.

If you have any users on the old installation besides Administrator, continue with the "For Both Windows XP and 2000" section. Otherwise, open Windows Explorer and make sure your data files are where they belong. Then go to Control Panel's Users and Passwords applet and delete the user Temp before skipping to "Finishing the Job."

For Both Windows XP and 2000
Reopen Windows Explorer. Select your C: drive (you may have to click Show the contents of this folder). Right-click in the right pane and select New, Folder. Name the new folder oldstuff. In the left pane, choose the Documents and Settings folder. It should have subfolders for each user from the previous install, plus one for Temp and a few others. Move the folders for your previous user names to oldstuff.

Select Start, Control Panel, User Accounts (Start, Settings, Control Panel, Users and Passwords in Windows 2000). Create an account for each user who was registered before the reinstall. Be sure to use the exact names. They are the same names as the folders you just moved to oldstuff (as shown in FIGURE 2). In Windows XP, at least one user must have administrator privileges.

Log off and back on as each user, before logging back on as Temp. Make sure that you select Log Off and not Switch User at Windows XP's Log Off dialog box (this isn't an issue in Win 2000).

Log on as Temp, select Start, Programs, Accessories, Command Prompt (in XP, Start, All Programs, Accessories, Command Prompt), type xcopy c:\oldstuff\*.* "c:\documents and settings" /s /h /r /c, and press Enter. Press a when asked if you want to overwrite a file. Log off Temp and log on to each restored account to make sure everyone's documents and data are where they belong. Log on as an administrator and run Control Panel's User Accounts applet again to remove the user Temp.

Finishing the Job
Now you've got Windows going, but not much else. You may have to reinstall your printer, sound card, and so on. Luckily, if a driver for the gadget came on your Windows or vendor restore CD, it was probably reinstalled automatically.

You'll have to reinstall your applications to reintroduce them to Windows. Some of their settings will not be changed by the reinstallation, but those that were stored in the Registry were wiped out.

Once your Internet connection is running again, browse to Windows Update and download all critical updates for your version (see FIGURE 3). Then visit the sites of your hardware vendors to update your drivers.

After the reinstall, some of your data may not show up where it should. Search for it in both your Application Data and oldstuff folders, and see if you can move it to the folder in which Windows or your apps are looking for it. If you find a folder called Identities with two subfolders whose names are long and indecipherable, try moving the contents of one to the other and see if your data reappears.

You've probably guessed that the final step is deleting the c:\oldstuff folder--and the Administrator folder in Windows 2000. Make this the very last step, however. Wait a couple of days, weeks, or even months until you're confident that all of your needed files are accessible.


How to disable or uninstall the pilot version of Microsoft Windows Genuine Advantage Notifications

Disable WGA Notifications

1. Log on to the computer by using an account that has administrative permissions.
2. Make sure that the WGA Notifications version that exists on the computer is a pilot version. The version format for the pilot version is 1.5.0532.x. In this case, you can uninstall versions 527-532 only. For example, you can uninstall versions that range from 1.5.0527.0 to 1.5.0532.2. To find the WGA Notifications version, follow these steps.
a. Click Start, and then click Control Panel.
b. Double-click Add or Remove Programs, click Windows XP - Software, click Windows Genuine Advantage Notifications, and then click Click here for support information.
c. In the Support Info dialog box, verify the version number, and then click Close.
3. Rename the following files by changing the extension to .old:
Rename %Windir%\system32\WgaLogon.dll to %Windir%\system32\WgaLogon.old
Rename %Windir%\system32\WgaTray.exe to %Windir%\system32\WgaTray.old
4. Restart the computer.


Manually uninstall WGA Notifications

1. Log on to the computer by using an account that has administrative permissions.
2. Make sure that the WGA Notifications version that exists on the computer is a pilot version. The version format for the pilot version is 1.5.0532.x. In this case, you can uninstall versions 527-532 only. For example, you can uninstall versions that range from 1.5.0527.0 to 1.5.0532.2. To find the WGA Notifications version, follow these steps:
a. Click Start, and then click Control Panel.
b. Double-click Add or Remove Programs, click Windows XP - Software, click Windows Genuine Advantage Notifications, and then click Click here for support information.

Note If Windows Genuine Advantage Notifications does not appear, the release version is installed. You cannot uninstall the release version of WGA Notifications.
c. In the Support Info dialog box, verify the version number, and then click Close.
3. Rename the following files by changing the extension to .old:
Rename %Windir%\system32\WgaLogon.dll to %Windir%\system32\WgaLogon.old
Rename %Windir%\system32\WgaTray.exe to %Windir%\system32\WgaTray.old
4. Restart the computer.
5. Unregister LegitCheckControl.dll by using Regsvr32. To do this, follow these steps:
a. Click Start, click Run, type cmd, and then click OK.
b. At the command prompt, type the following, and then press ENTER:
Regsvr32 %Windir%\system32\LegitCheckControl.dll /u
6. Restart the computer.
7. Click Start, click Run, type cmd, and then click OK.
8. At the command prompt, delete the following files by typing the Del command. Press ENTER after you type each command.
Del %Windir%\system32\wgalogon.old
Del %Windir%\system32\WgaTray.old
Del %Windir%\system32\LegitCheckControl.dll
9. At the command prompt, type regedit.
10. Locate and then right-click the following registry subkeys. Click Delete after you locate each subkey.
HKEY_LOCAL_MACHINE\SOFTWARE\Microsoft\WindowsNT\ CurrentVersion\Winlogon\Notify\WgaLogon
HKEY_LOCAL_MACHINE\SOFTWARE\Microsoft\Windows \CurrentVersion\Uninstall\WgaNotify

When starting up Windows, before the desktop appears I get a STOP 0x0000007F blue screen error message.

Possible Solution: If you have Symantec’s Norton Anti-Virus, this problem occurs because there is a limited amount of kernel space available for kernel drivers. For Windows 2000, this limit is 12 KB. If the operating system runs out of kernel space, then the computer displays a blue screen error message. See this web site for more information: http://service1.symantec.com/SUPPORT/ent-security.nsf/docid/2002071208532048?Open&src=w (See also: KStackMinFree.reg)

Also, turn OFF Windows XP’s Prefetching.

The Prefetcher component in Windows XP is part of the Memory Manager, and helps to shorten the amount of time it takes to start Windows and programs.

In some configurations, the prefetcher can cause errors (such as drivers not loading after bootup, Code 10 errors, etc.). It has also been said that the application prefetcher does not actually speed up application launching.

To disable the Prefetcher component, use Registry Editor (Regedit.exe) to locate the EnablePrefetcher value under the following key in the registry:

HKEY_LOCAL_MACHINE\SYSTEM\CurrentControlSet\Control\Session

Manager\Memory Management\PrefetchParameters

Change the value of the EnablePrefetcher value to 0 , and then quit Registry Editor. The next time you start your computer, the Prefetcher component will not start.

You can also adjust how the Prefetch behaves by chaning the value of "EnablePrefetcher" as follows:

0 ---- Disable Prefetching

1 ---- Enable Application Prefetch

2 ---- Enable Boot Prefetch

3 ---- Enable both Boot and Application prefetching (Default value)

5 is not a valid value for this parameter as it is a 2 bit switch.

Even if you keep the prefetch ON, you should periodically delete the contents of the following folder. It's contents will be refreshed in 3 days or immediately if you run the command below. Be sure to reboot

twice after deleting the contents of the folder.

Contents to Delete: c:\windows\prefetch

Rebuild Now (run):

%windir%\System32\rundll32.exe advapi32.dll,ProcessIdleTasks

System32 Folder Opens When Logging on to Windows

SYMPTOMS

When you log on to Microsoft Windows, a Microsoft Windows Explorer window may open that displays the contents of the System32 folder.

This behavior also occurs if there is a String value that contains only a single quote character (") as the Value data in the following Registry key:
HKEY_LOCAL_MACHINE\SOFTWARE\Microsoft\Windows\CurrentVersion\Run

CAUSE

This behavior can occur if a null, incomplete, or damaged entry exists in the registry.

RESOLUTION

WARNING: If you use Registry Editor incorrectly, you may cause serious problems that may require you to reinstall your operating system. Microsoft cannot guarantee that you can solve problems that result from using Registry Editor incorrectly. Use Registry Editor at your own risk.

Use Registry Editor to view the following two Windows registry keys:
HKEY_LOCAL_MACHINE\SOFTWARE\Microsoft\Windows\CurrentVersion\Run

HKEY_CURRENT_USER\Software\Microsoft\Windows\CurrentVersion\Run
Verify that all the values in these keys do not contain any incorrect, incomplete, or null entries (such as "").

MORE INFORMATION

An incorrect entry in the following registry value has been confirmed to cause the behavior described above:
Key: HKEY_LOCAL_MACHINE\SOFTWARE\Microsoft\Windows\CurrentVersion\Run
Value: ActiveMovie File Extensions
Value Type: REG_SZ
Value Data: ActMovie.exe /Check
If the value data for this entry is null or appears in Registry Editor as quotation marks, you may experience the problem described above. To correct the problem, change the value data to match the entry above or delete the ActiveMovie File Extensions value.

You can resolve this behavior by deleting the Remainder value that has "" next to it is in the following registry key:
HKEY_CURRENT_USER\Software\Microsoft\Windows\Current Version\Run

If you are uncertain whether an entry is incorrect or incomplete, you may want to delete all entries other than the default Windows entry. The following entry to run the System Tray is the only required Windows default entry:
Key: HKEY_LOCAL_MACHINE\SOFTWARE\Microsoft\Windows\CurrentVersion\Run
Value: SystemTray
Value Type: REG_SZ
Value Data: SysTray.exe